The ASUS TUF X299 Mark I Motherboard Review: TUF Refined
by Joe Shields on December 6, 2017 9:30 AM EST- Posted in
- Motherboards
- Asus
- TUF
- X299
- Skylake-X
- Kaby Lake-X
Overclocking
Experience with the ASUS TUF X299 Mark 1
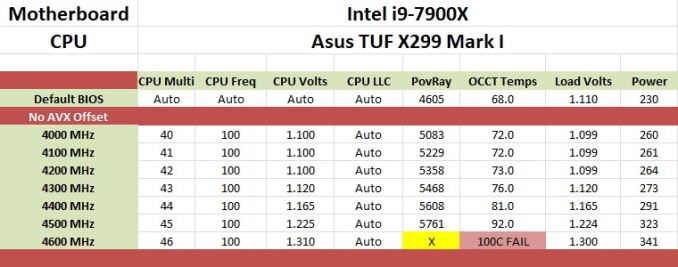
Automatic overclocking with the ASUS TUF was as simple as selecting which preset I want on the EZ System Tuning from within the BIOS or through the AI Suite/TUF software. The first setting attempted was named Extreme Tuning. When setting this option, the board gives a warning about the cooling required. This yielded a 39% overclock (there is a splash screen during POST showing this info) which came out to 4.6 GHz on all cores and ~1.30V. We know from our past manual testing of this chip, those voltages are a bit high for this CPU and will not pass our tests as the setup overwhelms our AIO cooler. The next step below that is Fast Tuning. When applying this option, the board sets the CPU to all cores running 4.3 GHz and voltage sits at 1.25V on load. We were able to pass our stability tests without issue here. Just be careful with the Extreme Tuning setting and that the right cooling is there for the job as its settings can overwhelm a lot of coolers on the market.
Manual overclocking was also easy through the ASUS BIOS. Unlike ASRock's BIOS, ASUS' overclocking options are all under one section, AI Tweaker. Users are able to change the vast majority, if not all options, for ambient overclocking of the CPU. Options like the CPU multiplier, BCLK, and Voltages for multiple domains are all found in the same section. The TUF did not have any issues with either set of memory and using the XMP profile so we were set there. The TUF also did not have an issue with setting the memory to 3600 MHz and running tests either (not pictured).
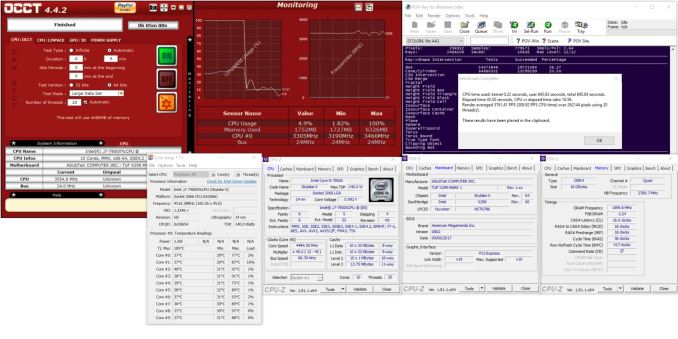
About the only thing to note here with this board are some of the sensor readings. CPUz doesn't seem to read vCore. When setting automatically or manually, the value remains close to what is seen in the picture below around .9V or so. OCCT was also unable to read the proper voltage. I am not entirely sure why this is happening, however, my theory is CPUz/OCCT are not hitting the proper registers for that value as the TUF has a few unique ICs for its Temperature monitoring/Thermal Radar. The good news is, the ASUS Thermal Radar 3 software picked it up accurately as well as my go-to temperature monitoring software, Coretemp.
I am pleasantly surprised to say that shroud covering the VRM heatsink didn't seem to cause any issues and did not see witness throttling in our testing.
Overclocking Methodology
Our standard overclocking methodology is as follows. We select the automatic overclock options and test for stability with POV-Ray and OCCT to simulate high-end workloads. These stability tests aim to catch any immediate causes for memory or CPU errors.
For manual overclocks, based on the information gathered from the previous testing, starts off at a nominal voltage and CPU multiplier, and the multiplier is increased until the stability tests are failed. The CPU voltage is increased gradually until the stability tests are passed, and the process repeated until the motherboard reduces the multiplier automatically (due to safety protocol) or the CPU temperature reaches a stupidly high level (90ºC+). Our test bed is not in a case, which should push overclocks higher with fresher (cooler) air.
Overclocking Results
Just as we saw on all the boards tested so far, we topped out at 4.5 GHz before we were temperature/cooling limited. In the 4.3 to 4.5 GHz clock speed range, the TUF did manage to use the least amount of voltage to pass our tests by a small margin of .005V. Truth be told, we read our voltages from software where read points are not found, so there is built in 'play' in the values listed. The voltage reduction didn't help push us past 4.5 GHz nor did it help with temperatures enough to worry about it. The ASUS BIOS does not show which level of LLC is active and was left on auto for testing. This yielded a WYSIWYG voltage from what was set in the BIOS to load. At 4.5 GHz and 1.225V, the system pulled 323W from the wall which was surprisingly the highest value of the boards tested so far.


15 Comments
View All Comments
DanNeely - Wednesday, December 6, 2017 - link
Why are you only reporting on non-UEFI post times?takeshi7 - Wednesday, December 6, 2017 - link
TUF motherboards should NOT have any electrolytic caps. The whole reason I bought my TUF motherboard was for the all solid-state caps. Asus please stop with this crap. I don't care about "Nichicon gold" audio capacitors. If I did I would buy one of your other boards like ROG. It doesn't make a big enough difference to justify the shorter lifespan, and anyone who cares about audio will have an external amp/DAC anyways.tphb - Wednesday, December 6, 2017 - link
It looks like a very nice board, but I still don't understand the need for "durable". You're going to put it in a case, right? One that has mounting screws to keep the board straight and one that keeps rocks from randomly flying up to hit the PCI-E mount surround. So why do you need all the extra plastic? It creates heat challenges (that require a fan) for no real benefit.BreakArms - Wednesday, December 6, 2017 - link
The original TUF Sabertooth back with the X58 chipset had a 5 year warranty and their marketing targeted "Military grade" lingo. I built a system for someone because of the long warranty. Today I'm not sure, it's likely that either they've been skimping on the quality and had to reduce their warranty to 3 years to keep from losing too much money or they had to reduce the warranty to 3 years anyway because their previous TUF boards were costing them too much to support.Anyway good job reviewing a board AT, I wish you'd return to regular reviews like this.
Ev3rM0r3 - Wednesday, December 6, 2017 - link
Here in the real world, all that armor on a motherboard is there ONLY for aesthetic reasons. Unless you are mounting it to an open air source but no one is going to do that. It clutters the board and probably adds in a 1/4 of the cost of the entire motherboard. I'd say just include a disk with 3d printable shielding for looks IF I wanted to have it, and then just not put anything on the board. Starting too look like cars with plastic engine covers; those are useless too.Hurr Durr - Wednesday, December 6, 2017 - link
Can these faux-shield things be removed? I doubt having them provides any practical benefit.DanNeely - Wednesday, December 6, 2017 - link
The easiest way is probably an equivalently specced board without them. They're the TUF line's main marketing gimmic.Joe Shields - Friday, December 8, 2017 - link
Yes. But if you do not want them, you can get the less expensive variant without it or a different board.JackNSally - Thursday, December 7, 2017 - link
Honest question. Can you get a higher performance cooler to really push the CPU and therefore the boards VRM's for overclocking features?Joe Shields - Friday, December 8, 2017 - link
The cooler isn't really the issue. We can put this under a custom loop, but the temperature improvement would only yield perhaps another 100 MHz or so. Delidding and going bigger would be a better way to do this.